Insulation Removal

Insulation Removal Perth is removing old or damaged insulation from walls and attics. This can be done to increase energy efficiency, address mold or pest problems, or prepare for other construction or remodeling work.

Insulation can be dangerous to remove if it is contaminated with asbestos or other hazardous materials. Therefore, it is best to hire a professional for safe and efficient removal.

Insulation removal is a procedure that may need to be performed for several reasons, including addressing mold or pest infestations, upgrading energy efficiency, or making space for construction work. The procedure typically involves removing old insulation from the walls or attic of a building and replacing it with new insulation. It is generally carried out by professional installers with the specialized equipment necessary to do so safely and effectively.

The first step in performing insulation removal is to prepare the workspace by removing furniture, shelving, and other items from the area that will be worked on. This can help to reduce the risk of injury by preventing items from being snagged or pulled by the insulation material as it is removed. It is also recommended that the flooring in the area of the house being worked on be covered with plastic sheets to protect it from adhesives and insulation fibers.

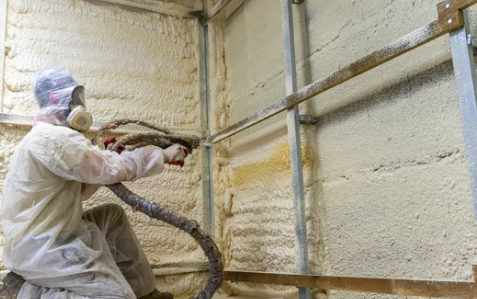
Once the work area is prepared, it is important to put on proper personal protective equipment before starting the actual removal process. This includes wearing rubber-coated gloves, a mask or respirator, and goggles or safety glasses. In some cases, full-body jumpsuits are also used to ensure that the lungs are protected from any potentially dangerous contaminants.

It is also advisable to wear earplugs or earmuffs to prevent damage to the ears by airborne dust and debris. Finally, it is important to use a high-powered insulation vacuum to remove blown-in or other types of attic insulation rather than attempting to pull the material out manually. Using the vacuuming method helps to avoid the release of any harmful contaminants into the home, and it also makes the cleaning-up process much faster.

Insulation that has become contaminated with contaminants such as mold, rodent excrement, or asbestos should only be handled by professionals with the right equipment and knowledge to handle it properly. Contaminated insulation is best replaced with new, effective materials to avoid the spread of these contaminants throughout the home. Professionals will conduct a thorough assessment of the contaminated insulation and the underlying areas, contain the affected space to minimize contamination, and ensure that all contaminants are removed with the appropriate measures.

Insulation removal is a critical process that helps maintain the health and efficiency of buildings. It can address aging insulation, pest issues, and other concerns that threaten the structure of homes and businesses. Insulation removal should be performed by experienced professionals and with proper safety precautions. It’s also important to take steps to prevent contamination during the process.

Removing insulation involves tearing down existing materials and replacing them with new ones. This can be done for various reasons, including reducing energy bills, improving home comfort, and preparing for remodeling or construction work. The most common type of insulation is fiberglass or cellulose. This material can be difficult to remove by hand, so it’s typically blown using industrial-grade hoses. If your home has cellulose insulation, cover furniture and other sensitive items with plastic to prevent dust from spreading throughout your living spaces.

When old or damaged insulation is removed, the space it leaves behind should be cleaned and prepared for new materials. This includes clearing the area of any debris, repairing or patching holes in the walls and ceilings, and addressing any signs of water damage in the attic or crawlspace. In addition, any areas that were impacted by smoke should be checked for damage and repaired.

Insulation is a very porous material that can easily harbor moisture. Over time, this can lead to mold and mildew growth that can cause some health problems for the homeowner. In some cases, it can even compromise the structural integrity of the attic or crawlspace in which it is located. If this happens, the contaminated insulation should be removed and replaced immediately.

The most effective way to improve home energy efficiency is by removing old, dirty insulation and replacing it with new, high-performance material. Not only will this make your home more comfortable year-round, but it will reduce your energy bills and increase its resale value. If you’re considering insulating your home, contact Ideal Insulation to discuss your options. Our experienced team has decades of insulation removal and installation experience, and we can help you save money and enjoy a healthier indoor environment.

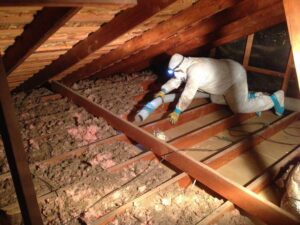
Before removing old insulation, it’s important to create a safe work area. This involves clearing away any obstacles, debris, or stored items in the attic space that could hinder the removal process or present a hazard to your health. It’s also recommended to work in sections of the attic to avoid overwhelming yourself and to maintain a systematic approach to the process.

Protective Gear: Wear goggles, gloves, and a dust mask to prevent contact with potentially harmful insulation fibers, dirt, or mold. A fully stocked first aid kit should be readily available to address any cuts or other injuries during the attic insulation removal process.

Insulation Disposal: Determine the specific guidelines and regulations regarding the disposal of old insulation materials in your region. It is often helpful to separate insulation from other waste materials, as this can make it easier for local waste management personnel to identify and handle the material properly.

Vacuum: Use a high-quality vacuum with a HEPA filter to clean up the attic space after removing the old insulation material. This will ensure that any lingering particles are captured and removed from the attic space, leaving it ready for additional attic improvements or future insulation installation projects.

Mold Contamination: If you discover any mold contamination during the attic insulation removal process, it’s recommended that you consult with a professional mold remediation specialist for testing and remediation services. Mold can pose serious health risks and must be addressed immediately to prevent the spread of mold spores throughout the attic space.

Insulation removal is removing old or damaged insulation from a building. It can be done for some reasons, including improving energy efficiency, addressing mold or pest issues, and preparing for remodeling or construction work. Insulation removal can be performed manually or with specialized equipment and is typically conducted by trained professionals.

The first step in insulation removal is a thorough inspection and assessment of the attic space to determine the type, condition, and amount of insulation to be removed. A risk assessment is also completed to identify any potential hazards and ensure that proper safety precautions are taken. Once the assessment is complete, it is time to begin removing the old insulation and preparing the attic for new installation.

Depending on the type of insulation and the level of contamination or infestation, removal can be done by hand or machine. If the insulation is contaminated or requires special handling, it may be best to bag and remove it by hand. For spray foam insulation, a special tool called an insulation removal vacuum is needed to safely and effectively remove the foam without releasing any harmful particles into the air.

Before the insulation removal begins, it is important to have the necessary equipment to make the job easier. For rolled or batt insulation, this includes a large industrial-grade vacuum specifically designed to remove loose insulation materials. It is also a good idea to have several large garbage bags, a trailer to transport the bags away from the home, and a HEPA-filtered shop vac to clean up any remaining debris.

If there is a significant amount of asbestos or vermiculite present in the attic, it will need to be dealt with separately from regular insulation removal and disposal. This will require additional safety measures and will often be a more expensive project to complete.

Once the insulation is removed, it must be disposed of following local waste management regulations. Contact your local waste management organization to learn how this is done in your area.

Spray Foam Insulation Cost

insulation

Spray foam insulation can be a good option to reduce your energy costs. It is more expensive than traditional insulation materials, but it can save you money over time by sealing air leaks and reducing your utility bills.

Most Spray Foam Insulation Houston is made from polyurethane, but there are soy-based and water-based options that may be more environmentally friendly. These products contain fewer chemicals, which have a lower global warming potential than the HFCs used in polyurethane.

Cost of Materials

When homeowners choose spray foam insulation, they’re usually looking to reduce energy costs. This insulation is denser and more air-tight than fiberglass blankets, batts, and rolls, which helps to cut down on heat transfer in and out of a home. It can also help to seal air leaks and reduce unwanted noise. Some types of spray foam also act as a vapor barrier, helping to keep moisture out and prevent mold.

There are several factors that can affect the cost of spray foam insulation materials, including type and R-value. R-value is a measure of the insulation’s ability to resist heat and cold thermal transfer. The higher the R-value, the better the insulation.

Polyurethane is the most common type of spray foam insulation, and it typically costs $0.44 to $1.50 per board foot when professionally installed. It’s best suited for attics and basements and is available in open- or closed-cell varieties. Open-cell foam is softer and more flexible than closed-cell insulation, but it does not have the same R-value.

Another important factor that can impact the cost of spray foam insulation is whether it’s being installed in a new or existing building. It’s more expensive to install in an existing home because it requires labor to access and reseal wall cavities. The type of siding on the house also impacts labor costs. Vinyl is the easiest to work with, while brick and wood require more labor to remove and replace.

Lastly, some homeowners may be able to qualify for rebates or tax credits if they’re installing spray insulation to improve their home’s energy efficiency. Check with your local government to find out what programs are available in your area.

If you’re considering adding spray insulation to your home, it’s best to consult a professional contractor to avoid any mishaps or wasted material. They’ll be able to help you determine what type of spray foam is best for your home and provide you with a quote for installation. If you’re ready to get started, find a top-rated pro near you and request a free project estimate.

Cost of Installation

There are several factors that affect the cost of spray foam insulation. Some of these include the type of spray foam and the type of house. Closed-cell foam is typically more expensive than open-cell spray foam, but both offer the same energy efficiency and thermal performance. Homeowners can save money by choosing to have open-cell spray foam injected into their walls while opting for closed-cell foam in the attic and crawl space. Some companies also offer discounts when insulating the entire home with their product.

The size of the area to be insulated also influences the cost of spray foam. On average, it costs $44 to $150 per square foot of wall that needs insulating. However, homeowners should be aware that a large project can cost significantly more than a small one. This is because contractors have to take out drywall and other materials in order to apply the insulation, which drives up labor costs.

It’s important to note that spray foam is not a DIY product, and the installation process should be left to professionals who are trained and certified in spray foam installation. This is especially important because improper installation could lead to the insulation failing and causing damage. It’s also possible that the contractor will need to perform other work before installing the spray foam, such as removing old insulation and installing a new vapor barrier.

Other cost considerations include the age of the house and whether it’s in need of a vapor barrier. A vapor barrier helps to prevent mold, mildew, and other moisture issues, so homeowners should make sure that this is included in the estimate. Additionally, homeowners should be aware that colder climates require thicker insulation than warmer ones.

It’s also worth noting that some local governments offer rebates and tax credits to encourage homeowners to upgrade their homes’ energy efficiency. It’s a good idea to check with your local government before beginning your project to see what incentives are available. This can help you save even more money on the investment. Finally, homeowners who are planning to have their spray foam insulation installed should consider bundling it with other energy-saving projects. For example, if they’re going to be opening up their walls to inject the insulation, it makes sense to install new windows at the same time.

Cost of Removal

A professional technician will be able to install spray foam insulation in your attic quickly and efficiently. However, you will need to pay for removing the old insulation and disposing of it properly. This is an additional cost of up to $0.70-$1.50 per square foot. The cost of removing spray foam is higher for homes with rodent infestations and for those who have a lot of loose debris in the attic.

If you’re removing your old insulation, you should also consider the cost of a new ladder and other supplies, such as a commercial vacuum cleaner, HEPA filtered shop-vac, a hose, and a dustpan. You will also need a mask to prevent errant particles from getting into your lungs.

Whether you hire a professional to remove the spray foam or do it yourself, you will need a lot of patience and the right tools. Using a power tool to scrape off the cured spray foam is much faster and easier than trying to cut it with a razor blade or knife. The best way to protect your health is to wear a face mask when working with spray foam.

Spray foam is a liquid that bonds to surfaces, expands and hardens, which makes it extremely durable. However, it’s not known for being flexible, so if you are planning to use it in a space that’s likely to move or change shape, consider alternative insulation options such as fiberglass batts or rigid foam boards.

The amount of spray foam insulation you need depends on the size of your home and its level of energy efficiency. You’ll need more insulation if your house has an older roof or uninsulated crawl spaces. In addition, you’ll need more insulation if your house is in an area that experiences high temperatures or frequent temperature fluctuations.

If you’re upgrading to spray foam insulation, it’s a good idea to combine the project with other home improvement projects to keep your costs down. For example, if you’re insulating your attic, you can add energy-efficient windows at the same time. This will help reduce your energy costs and create a more comfortable environment for you and your family.

Cost of Repairs

Spray foam insulation combines isocyanate and polyol resin to create a flexible material that keeps moisture out and air leaks out. It also provides a high R-value, or thermal resistance, which reduces hot and cold temperatures by keeping air trapped between wall studs. Spray foam is especially effective when insulating attics and crawl spaces. It can also be used to insulate pole barns, pool houses, and sheds. Adding insulation to these structures reduces energy costs by providing more efficient heat in winter and cooling in summer.

While you can buy spray foam insulation kits, hiring a professional contractor is typically the best option. Professional insulation installers understand how the chemicals in spray foam react, how to apply the materials evenly to prevent sagging and swelling, and how to meet local building codes. They can also provide a variety of other benefits, including lower utility costs, mold and mildew resistance, and improved air sealing and soundproofing.

The cost to insulate a home using spray foam depends on the size of the space and the type of insulation chosen. In general, open-cell foam is cheaper than closed-cell foam, and different parts of the house require a different thickness of insulation. For example, walls need a thinner layer of insulation than floors or ceilings, and attic insulation needs a thicker layer than drywall. Depending on the type of insulation, contractors may need to install a vapor barrier, which doubles as a water seal and can protect the home from water damage.

Before installing new insulation, it’s important to remove any existing insulation. This protects homeowners from possible allergens, such as mold spores or rodent excrement, and can save money by eliminating the need for additional drywall repairs. However, removing existing insulation can be a messy and labor-intensive project. In some cases, professional contractors charge $1 to $2 per square foot to remove insulation.

The average cost of spray foam insulation for a single-story home ranges from $8,000 to $22,000, depending on the type of insulation and whether the house is in new construction or renovation. The cost of spray foam insulation for a two-story home varies from $20,000 to $35,000.